How to Create Datasets for Playback
With NSDK's Recording feature, you can record the real-world location of your AR application for playback and testing in the Unity Editor. You can create a playback dataset by using the Recording sample project or by recording through the API.
Recording data
Recording formats
NSDK can produce two versions of a scan recording:
- Raw Scan format: By default, AR Scanning Manager will write frames directly to disk.
- The Raw Scan format is the input format for the Scan Reconstruction API. You can use it to generate a textured mesh or a Gaussian splat from a single scan using classes such as
TexturedMeshProcessororGaussianSplatProcessor. - The files are saved to the directory at
ScanStore.SavedScan.ScanPath. Metadata is stored in.pbfiles.
- Playback format: Optionally, the recorded frames can be exported to a compressed .tgz archive.
- This is the format that Playback and VPS accept.
- The sequence is archived to
ScanStore.SavedScan.ScanBasePathin a.tgz. After extracting the archive, metadata is stored incapture.json. - Playback datasets must be recorded through NSDK and are not convertible from standalone video.
This walkthrough demonstrates how to produce the second format for use with Playback.
File locations
By default, scan recordings will be saved to these paths. Setting AR Scanning Manager's Scan Path field to a custom location will override this. In Unity apps, the saved location is available in the ScanStore.SavedScan.ScanBasePath property.
| Platform | Unity SDK | Native SDK |
|---|---|---|
| iOS | {App Files}/scankit/ | {App Files}/scankit/ |
| Android | /sdcard/Android/data/{app.package.name}/files/scankit/ | /sdcard/Android/data/{app.package.name}/files/scankit/ |
| macOS | /Users/{Username}/Library/Application Support/{CompanyName}/{ApplicationName}/scankit/ | {Application path}/data/scankit/ |
| Windows | C:\Users\{Username}\AppData\LocalLow\{CompanyName}\{ApplicationName}\scankit\ | C:\Users\{Username}\AppData\Local\ardk_data\scankit\ |
To retrieve the files from an iOS app in Finder, add UIFileSharingEnabled and LSSupportsOpeningDocumentsInPlace to the app's info.plist. To retrieve the files from an Android app, use adb pull with the appropriate path.
Using the Scanning Sample to Record
Prerequisites
To scan using the Recording sample project, you will need to download it and build it to your device. For more information, see the Recording sample project.
Steps
To record a playback dataset using the sample:
-
Open the recording sample on your device. If running on iOS, connect to the internet the first time you scan. When you are ready to record the dataset, tap Start.
-
Wait for the recording to begin. When scanning with Unity on iOS, there is a brief delay the first time that scanning starts while the SDK downloads a model file to convert Unity's MSL altitude values to WGS84.
-
Record the environment using your device's camera. Keep in mind the following:
- Keep your device in Portrait Mode. The sample UI and recording settings assume portrait orientation.
- Hold your device as steadily as possible to reduce errors in the dataset.
- The sample saves dataset recordings every minute. Each minute is saved as a separate scan ID in the scan store. If you continue recording after one minute, the app will start a new recording. (For example, if you record for 3.5 minutes, the sample creates four separate datasets.)
-
Tap Stop to finish recording. At this point, you have a recording in Raw Scan format.
-
When you are ready, tap Export to convert your most recent Raw Scan recording to a Playback format dataset.
-
After the export is complete, the sample will display a path to the archived dataset. Remember this path and proceed to Accessing Your Recorded Data on the Device.
For Unity iOS builds, NSDK is configured to convert the MSL altitude provided by Unity to WGS84. This conversion requires a one-time download. The first time that scanning runs on iOS, the device must have an active internet connection and will experience a brief delay while the 20 MB model file downloads.
Using the API to Record Datasets
If the Recording sample is too limited for your project, you can create your own recording app instead.
Prerequisites
You will need a Unity project with NSDK installed and a set-up basic AR scene. For more information, see Setting Up the Niantic SDK for Unity and Setting up a Basic AR Scene.
Steps
-
Enable scanning in NSDK Settings:
-
In the NSDK top menu, select Settings.
-
In the Inspector window, check the box labeled Scanning.
-
-
In your AR Scene, add an AR Scanning Manager to the scene, then disable it so your script controls when recording stops and starts:
-
Select the ARSession
GameObject. -
In the Inspector window, click Add Component, then add an AR Scanning Manager to it.
-
Un-check the box next to
AR Scanning Manager (Script)to disable it.cautionEnabling Record Estimated Depth to record NSDK depth buffers on non-LiDAR devices will limit the AR Scanning Manager's recording FPS to the update rate of the depth feature, regardless of AR Scanning Manager's Recording Framerate selection.
To change the update rate of the depth feature from its default rate of 10 FPS, add an
Nsdk Occlusion Extensioncomponent on the sameGameObjectas anAR Occlusion Managerand set the Target Frame Rate.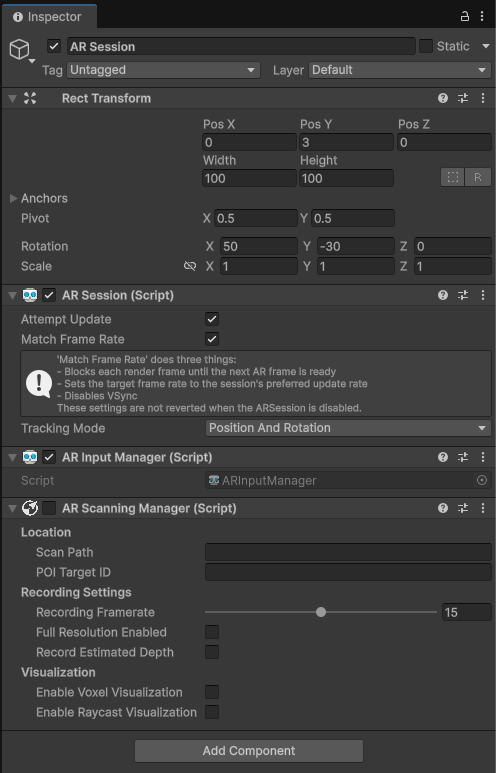
-
-
Create two buttons in your scene; one to start the recording, the other to stop it.
- Right-click in the Hierarchy, then, in the UI menu, select Button. Rename the Button "Record".
- Repeat the previous step, naming the new button "Stop".
- For each button, expand its
GameObjectand select theTextsub-object, then change theTextfield to "Record" or "Stop", as appropriate. - Move the buttons in the scene view to where you would like them.
-
Create scripts to drive the recording, then connect them to the buttons:
-
In the Project window, right-click in the Assets folder.
-
Select C# Script from the Create menu.
-
Name the new script
StartScript. -
Create another script and name it
RecorderInput. -
Populate the scripts with the following code:
Expand to reveal StartScript.cs
    using System.Collections;
    using System.Collections.Generic;
    using UnityEngine;
    using UnityEngine.Android;

    public class StartScript : MonoBehaviour
    {
        public void StartButton() {
            // get permission to use location data if on Android
            // then enable location and compass services
    #if UNITY_ANDROID
            if (!Permission.HasUserAuthorizedPermission(Permission.FineLocation))
            {
                var androidPermissionCallbacks = new PermissionCallbacks();
                androidPermissionCallbacks.PermissionGranted += permissionName =>
                {
                    if (permissionName == "android.permission.ACCESS_FINE_LOCATION")
                    {
                        StartButton();
                    }
                };

                Permission.RequestUserPermission(Permission.FineLocation, androidPermissionCallbacks);
                return;
            }
    #endif
            Input.compass.enabled = true;
            Input.location.Start();
        }
    }
Expand to reveal RecorderInput.cs
using System.Collections;
using System.Collections.Generic;
using NianticSpatial.NSDK.AR.Scanning;
using UnityEngine;

public class RecorderInput : MonoBehaviour
{
    [SerializeField] private ARScanningManager _arScanningManager;

    public async void StopRecordingAndExport() {

        // save the recording with SaveScan()
        // use ScanStore() to get a reference to it, then ScanArchiveBuilder() to export it
        // output the path to the playback recording as a debug message
        string scanId = _arScanningManager.GetCurrentScanId();
        await _arScanningManager.SaveScan();
        var savedScan = _arScanningManager.GetScanStore().GetSavedScans().Find(scan => scan.ScanId == scanId);
        ScanArchiveBuilder builder = new ScanArchiveBuilder(savedScan, new UploadUserInfo());
        while (builder.HasMoreChunks())
        {
            var task = builder.CreateTaskToGetNextChunk();
            task.Start();
            await task;
            Debug.Log(task.Result);   // <- this is the path to the playback recording.
        }
        _arScanningManager.enabled = false;
    }

    public void StartRecording() {
        _arScanningManager.enabled = true;
    }

}
-
-
Create an empty
GameObjectin the scene.- In the Hierarchy, right-click to open the context menu.
- Select Create Empty.
- Name the new
GameObject"RecordScripts".
-
Add the recording scripts to
RecordScripts.-
Select
RecordScriptsin the Hierarchy. -
Select Add Component in the Inspector.
-
Add
StartScript. -
Add
RecorderInput. -
In the
RecorderInputcomponent, assign the AR Scanning Manager from the Hierarchy.
-
-
Select the
Recordbutton in the Hierarchy and configure its On Click () events:-
In the Inspector, locate Button (Script) → On Click ().
-
Select + to add a new entry.
-
Drag the
RecordScriptsGameObjectinto the object field. -
From the function dropdown, choose
StartScript→StartButton. -
Select + again to add another entry.
-
Drag the
RecordScriptsGameObjectinto the object field. -
From the function dropdown, choose
RecorderInput→StartRecording. -
In the On Click () list, drag
StartScript.StartButtonaboveRecorderInput.StartRecordingso it runs first. -
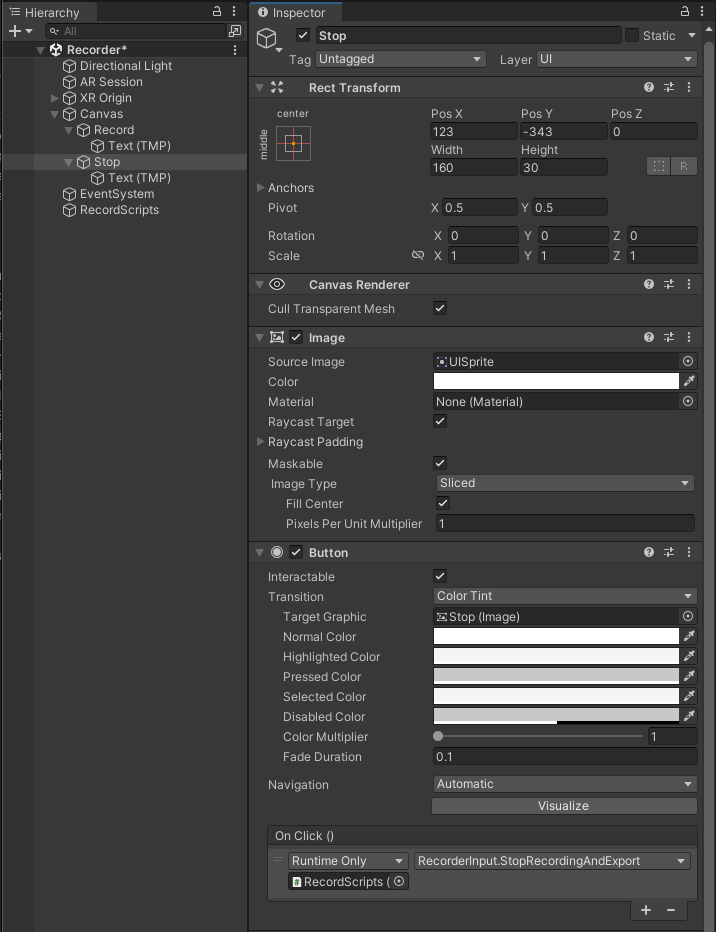
Select the
Stopbutton and repeat the process, choosingRecorderInput→StopRecordingAndExport.
-
-
Build to your device and test it out!
Accessing Recorded Data on the Device
Follow the instructions for your device's operating system:
Exporting from iOS
-
Enable developer mode on your device:
- Open the Settings app.
- Open the Privacy and Security menu.
- Enable Developer Mode.
-
Connect your device to Xcode.
-
Open the Window top menu.
-
Select Device and Simulators.
-
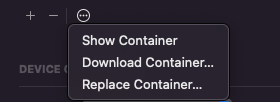
While highlighting the sample app, select the ellipsis (...) menu.
-
Select Download Container.
-
Once the container downloads to your machine, right-click on the package, then click Show Package Contents.
-
Navigate to the path from the recording output (for example:
AppData/Documents/scankit/(ID of your scan)/chunk_0.tgz). -
Copy the archive to your machine, then unzip it.
Exporting from Android
- Connect your device to your development machine.
- Get the files from your device:
- In macOS:
- Open Android File Transfer.
- Navigate to the path from the recording output. You may also choose to use Android Studio's Device Explorer, or another tool of your preference.
- In Windows:
- Select File Transfer from the dialog box.
- Navigate to the path from the recording.
- In macOS:
- Copy the archive to your machine, then unzip it.
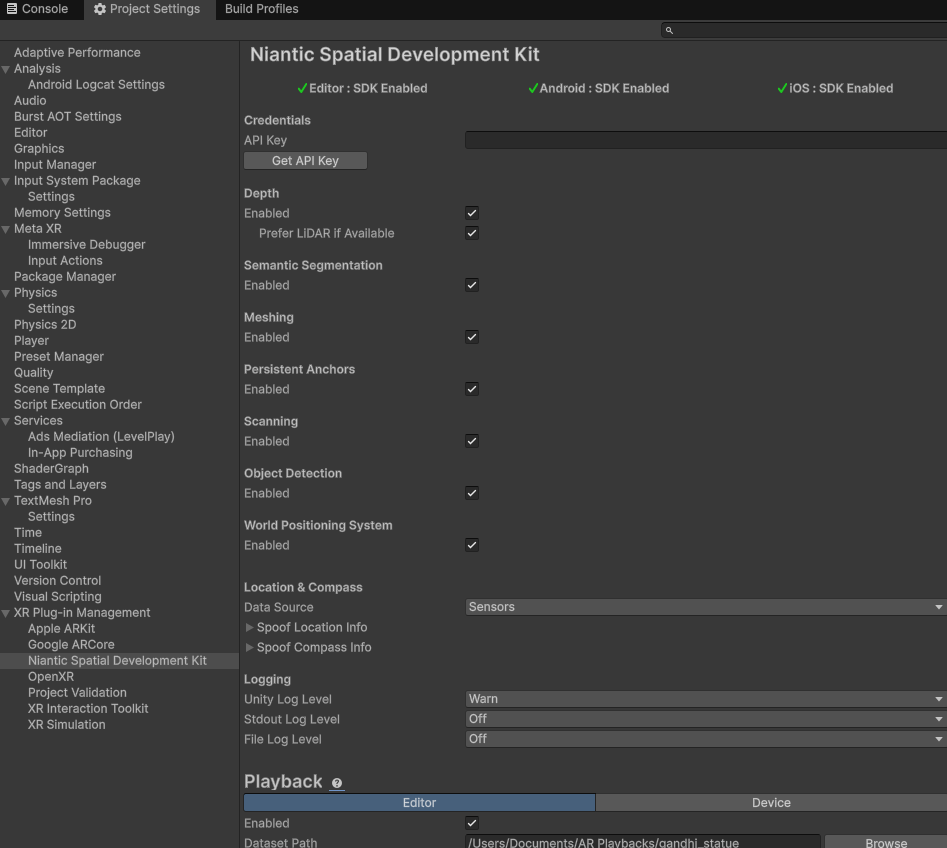
Using the Playback Data in Unity
Ensure the Niantic Spatial Development Kit for Unity Editor plugin is enabled under XR Plug-in Management > Desktop.
To add a playback dataset to Unity:
- Open Project Settings from the Edit menu.
- Scroll down to XR Plugin Management.
- Select Niantic SDK.
- Enable Editor Playback.
- Enter the absolute path to your dataset in the Dataset Path field.
- If you're using on-device playback, make sure the dataset is copied into the
Assets/StreamingAssetsdirectory of your Unity project before building.